6502 Assembly Language
Part 1: Introduction
Through this blog post, I will be learning about the 6502 assembly language. I will be learning basic operations and features of the language, as well as how to calculate a portion of code's execution time. I will be focusing on the below code snippet while exploring how to make changes for desired output and better performance.
👉 The following 6502 emulator will be used to run code throughout this lab: http://6502.cdot.systems/
Initial Code:
        lda #$00	; set a pointer at $40 to point to $0200
	sta $40
	lda #$02
	sta $41

	lda #$07	; colour number

	ldy #$00	; set index to 0

loop:	sta ($40),y	; set pixel at the address (pointer)+Y

	iny		; increment index
	bne loop	; continue until done the page

	inc $41		; increment the page
	ldx $41		; get the current page number
	cpx #$06	; compare with 6
	bne loop	; continue until done all pages
The above code fills the emulator's graphics screen with the colour yellow.
Output:

How this code works:
The first 4 lines of code set a pointer to point to the beginning location of the first page of the graphics screen. Next, the accumulator is loaded with the colour code for yellow, this will be used to colour the individual pixels of the graphic screen. Then the index of the Y-register is set to 0. At the beginning of the loop, the value of the accumulator is stored at the pointer address + the value contained in the Y-register. On the first iteration, this would be $0200+$00 which would equal $0200, the first location of the first page of the graphics screen. Next, the Y-register is incremented and the loop is checked. This will loop until the first page is filled. Then the page number is changed by incrementing the value within the pointer containing the page number. This new number is compared to 6 and if it does not equal 6 then it branches back to the loop to fill the next page. This outer loop exit only after all four pages are filled.
Part 2: Calculating Performance
1. Calculate how long it takes for the code to execute, assuming a 1 MHz clock speed.

2. Consider ways to decrease the time taken to fill the screen with a solid colour. Calculate the execution time of the fastest version of this program that you can create.
Scenario 1
Cut out the outer loop and create 4 individual loops for each page. The pointer set up at the start would no longer be necessary. However, a degree of hard-coding would be needed to define the beginning of each page.
The code would look like:
        lda #$07	; colour number

	ldy #$00	; set index to 0


loop_a:	sta $0200,y	; set pixel at the address $0200(start of page 1)+Y

	iny		; increment index
	bne loop_a	; continue until done the page

loop_b:	sta $0300,y	; set pixel at the address $0300(start of page 2)+Y

	iny		; increment index
	bne loop_b	; continue until done the page

loop_c:	sta $0400,y	; set pixel at the address $0400(start of page 3)+Y

	iny		; increment index
	bne loop_c	; continue until done the page

loop_d:	sta $0500,y	; set pixel at the address $0500(start of page 4)+Y

	iny		; increment index
	bne loop_d	; continue until done the page
This code reuses the inner loop from the initial code and duplicates it for each of the 4 pages.
Scenario 2
Remove all loops and store the colour into each location individually. This version would be 100% hard-coded since the locations of each specific pixel of the graphic screen will be written out.
The code would look like:
	lda #$07	; colour number
	ldy #$00	; set index to 0

	sta $0200,y	; fill each location
	sta $0201,y
	sta $0202,y
	sta $0203,y
	sta $0204,y
	sta $0205,y
	sta $0206,y
	sta $0207,y
	sta $0208,y
	sta $0209,y
	sta $020a,y
	sta $020b,y
	sta $020c,y
	sta $020d,y
	sta $020e,y
	sta $020f,y
	. . .
The above code only shows how to fill in the first half of the first line of the graphics screen. 1008 more lines of code would be required to fill the rest of the screen with yellow.
In terms of code, this method may seem ridiculous since it is not very efficient and will come along with a hefty size. On the contrary, this version is a very fast method to fill the screen with a solid colour.
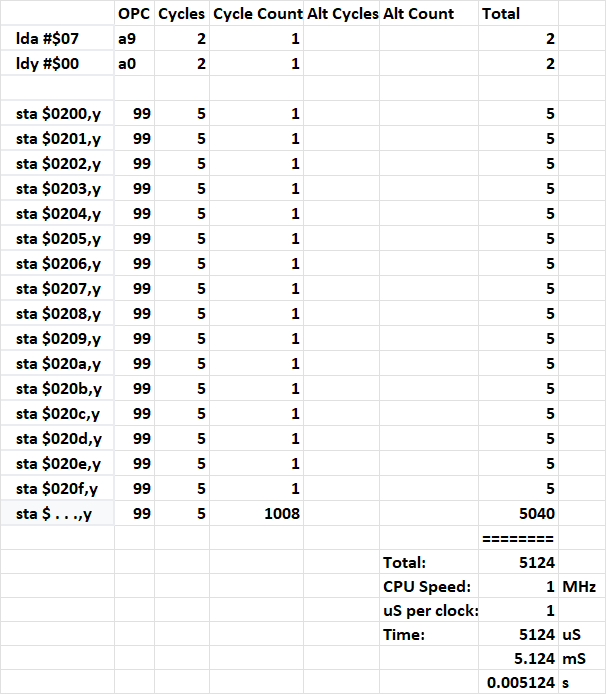
This code will take 5124 microseconds or 5.124 milliseconds to execute, which is a very big speed improvement. This code takes less than half of the CPU cycles that the initial code does and, therefore, less than half of the time to execute.
Part 3: Modifying Code
1. Change the code to fill the display with light blue instead of yellow.
        lda #$00	; set a pointer at $40 to point to $0200
	sta $40
	lda #$02
	sta $41

	lda #$0e	; colour number

	ldy #$00	; set index to 0

loop:	sta ($40),y	; set pixel at the address (pointer)+Y

	iny		; increment index
	bne loop	; continue until done the page

	inc $41		; increment the page
	ldx $41		; get the current page number
	cpx #$06	; compare with 6
	bne loop	; continue until done all pages
To get the desired result, the only change required was a change to line 5.
lda #$0e ; colour numberI changed the previous colour code, which represented the colour yellow ($7), to $e which is the colour code for light blue. Now the colour code for light blue is loaded into the accumulator and used to colour in each pixel of the graphics screen.
2. Change the code to fill the display with a different colour on each page (each "page" will be one-quarter of the bitmapped display).
To get the desired output of displaying a different colour on each page, I removed the outer loop. The inner loop remains to fill in each page with the specified colour. However, the page is incremented explicitly 3 times and each time the page is incremented, I also explicitly load the accumulator with a new colour. The logic is repeated for each page: set page, set colour, and fill the page with the specified colour.
        lda #$00	; set a pointer at $40 to point to $0200
	sta $40
	lda #$02
	sta $41

	lda #$06	; set colour number

	ldy #$00	; set index to 0

loop_a:	sta ($40),y	; set pixel at the address (pointer)+Y

	iny		; increment index
	bne loop_a	; continue until done the first page


	inc $41		; increment the page
	lda #$07	; change colour

loop_b:	sta ($40),y	; set pixel at the address (pointer)+Y

	iny		; increment index
	bne loop_b	; continue until done the second page


	inc $41		; increment the page
	lda #$08	; change colour

loop_c:	sta ($40),y	; set pixel at the address (pointer)+Y

	iny		; increment index
	bne loop_c	; continue until done the third page


	inc $41		; increment the page
	lda #$09	; change colour

loop_d:	sta ($40),y	; set pixel at the address (pointer)+Y

	iny		; increment index
	bne loop_d	; continue until done the fourth page
Output:

Part 4: Experience & Final Thoughts
Through my experience in this lab, I have found that the 6502 assembly language is quite straightforward with its operations. I was overwhelmed at first but that is to be expected when learning something new! This helped me relearn a lot of concepts as well as expand my knowledge of a new language.
It was also great to get some insight into the execution speed of code and how updates to the code affect this. I have known that changes impact speed and performance in different ways but this is the first time that I have been able to explore this and directly see how my own changes to a piece of code impacts the way it is executed.
Comments
Post a Comment